Wednesday, October 6, 2010

Super Saturday!!

Wow, it's been a long time! I'm returning to the Blogosphere to let you all know about the fabulous projects we have for this year's Super Saturday!

First, the details! Super Saturday will be held on October 23, 2010 begining at 10:00 at the Foxtrail Building. (Is that what our building is called?) We plan on going until 3:00, with classes, demos, and workstations set up for the entire time! We will be having a yummy lunch of soup, rolls and salads from noon to 1:00, so if you can only manage to sneak away for a little on Saturday, come for lunch!

We are excited to have invited Traverse Mountain 3rd Ward to join us! We can't wait to get to know you ladies better!

Now, the important stuff--the projects! This will be long, but totally worth the time to read. Thanks for staying with me. . .

All of these projects were planned with economical gift giving in mind. Of course many of them are going to be hard to part with! Mostly we hope that you will learn new skills that will allow you make things beautiful gifts, will help beautify your life and spark your creativity!

We have planned the day so that you can make as many of these projects as you would like. Our schedule is very loose, which gives you the ability to attend a demonstration and then work on projects at your own pace. Fee free to sign up for mulitples of certain projects that interest you, but please keep in mind that the ladies preparing the projects are busy moms or working women or both, and don't go too crazy! Don't worry, there will be a list of sources for you to get your own materials on your own. . .and we're a helpful bunch! I don't think any of us would mind helping you out outside of the Super Saturday activity!

HARVEST BLOCKS $9
We all know and love these blocks! They are great to display on top of fireplace mantels, entertainment centers or anywhere that you have a flat surface to put something on. (The paper on this project will vary)


PAPER WREATH $4
This wreath is made entirely out of paper and could be adapted to any holiday or season! You will definitely be able to make more of these at home with no special equipment! (The paper and ribbon on this project will vary)


BANG FOR YOUR BUCK HOLIDAY BAKING AND PACKAGING, FREE!!!
Do you love to give neighbor gifts, but don't have a lot of money to spend? This is the perfect class for you! Come and watch a baking demo as well as view our display table that will be full of cute ideas for packaging your baked goodies! Later, you'll get to sample everything we've made. . .these goodies are going to be our dessert for the day! (PS Kim Kosorok is going to be doing some of the baking-you know you're not going to want to miss that!)


SOLDERED GLASS PENDANTS $8 w/o CHAIN, $11 with chain
We know you're excited about this one! We all love these pendants, but most of us probably would love to know how to get one without having to spend $30 per piece! You will learn how these are made, and can even learn how to do the soldering yourself. Of course, this will require some special equipment of your own if you want to make more, but for the price of about two full price pendants, you can have everything you need to make as many as you'd like! When you sign up for this please don't forget to let us know what initial you'd like for your pendant. (Oh and PS--we could use some extra soldering irons for this activity. If you have one that you'd be willing to lend, we would really appreciate it. Even better, if you already know how to solder and would be willing to help out for a while, please let us know! Thanks!)

COUNTDOWN TO SANTA CALENDAR $10
Isn't this so cute? I know you can think of a few people who would like one of these--even if only the little people you tuck into bed every night!
(Papers will vary for this project)


FELTED SOAP $3
These felted soaps are really cool! Learn how to felt with raw wool and make a regular bar of soap into an exfoliating bar that will leave your skin bright and soft. Everyone you know is going to want these!


FABRIC FLOWERS, FREE
Come and learn how to make these gorgeous fabric flowers! Once you know how to make these you can make bows, pins and jewelry for you (or you daughters. . .or your friends. . .or your sister. . . .you get the point!) for mere pennies!

Oh, and don't forget to bring something warm enough to wear to work outside! We have to use candles for the


WOODEN PHOTO DISPLAY $15
Don't you think that this would make a great grandparent gift? You could put family photos in the 4 photo slots, or anything else that you want. The teacher for this class will contact you for paper color and quote choices to make this a completely custom project that anyone would be thrilled to display on their mantel!


FRAME JEWELRY ORGANIZER $15
This is a great way to organize your earrings, necklaces and bracelets on your bathroom or closet walls. This project will include a demo on how to drill holes in the frame and attaching the metal screening, and then you will go off on your own to finish.


LAMPSHADE CHANDELIER $8 ($4 if you have your own lampshade)
These are adorable, aren't they?!? For these you will have to bring your own fabric. We have lots of stuff for girlier chandeliers, but will have Cricuts there so you can make embellishments for boy ones, or holiday ones, or any other theme that you'd like. (For another idea, here is a link to a Halloween one that I saw on the Internet yesterday.) This project truly lets you be as creative as you want to be! (You will have to provide your own fabric for this project, and we strongly encourage you to bring your own lampshade. We're scouring the thrift stores for lampshades with interesting shapes, but we can't possibly find enough to meet everyone's need! Sorry!)

ELECTRICAL SOCKET COVER, FREE

SORRY, NO PHOTO AVAILABLE FOR THIS ONE, YET! (We're working on it!) This is a cute and easy way to adorn an often overlooked area in your house! These would be especially cute in your kitchen. The covers will be made with wooden stars that you will be able to paint to match your decor.

APRON, VARIES
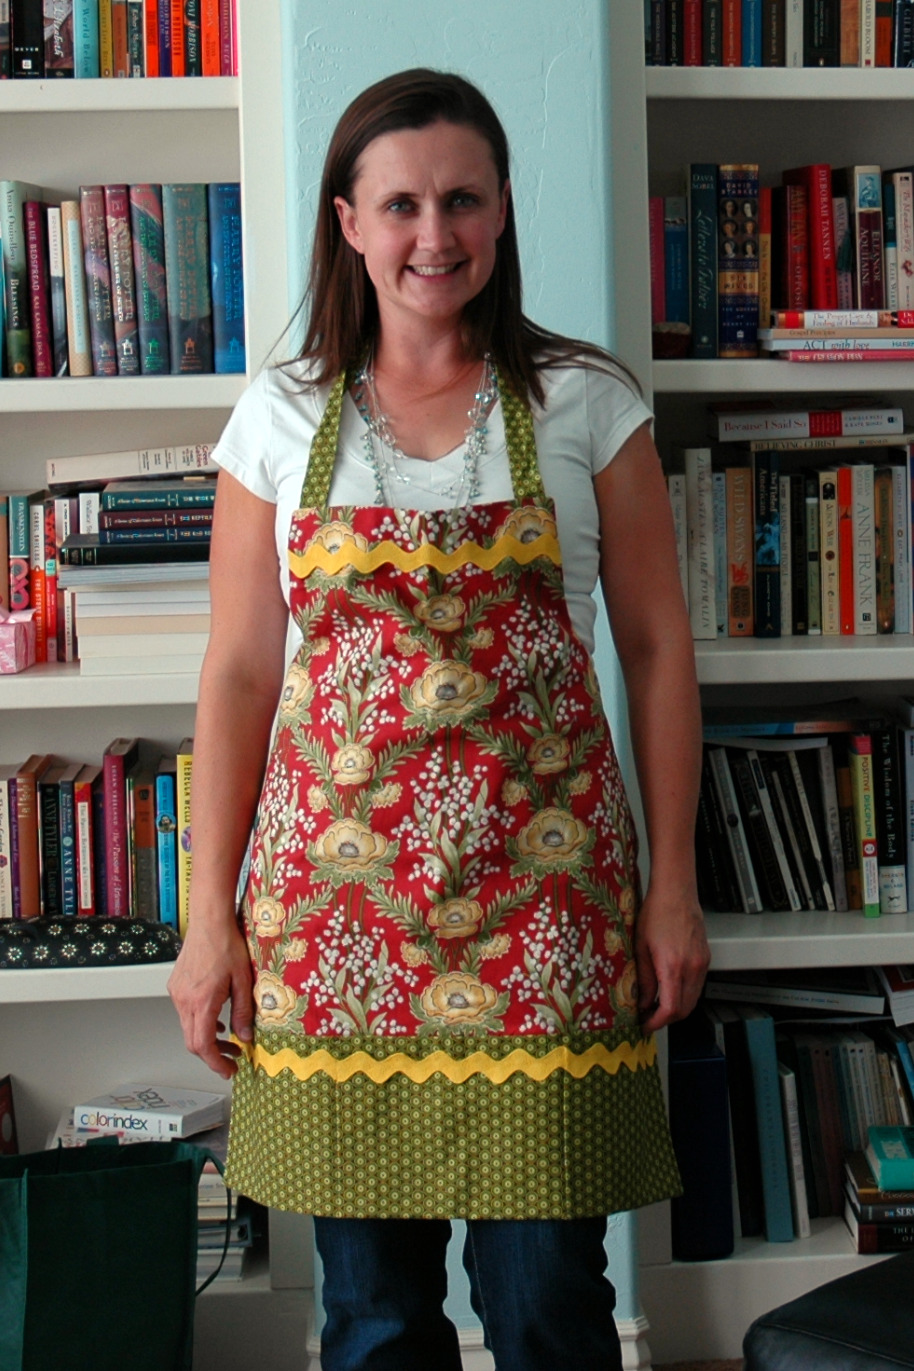
This project is a pretty involved one. We may or may not do it at Super Saturday--it takes about 2 hours for an experienced seamstress. We will have the pattern available for anyone who wants to take it home and make it on your own. Sewing help will be available anytime!


You made it to the end! Congratulations! I hope you're excited to learn some new skills and make some really great stuff! Now, what do we need from you? It's simple, really!

1. Print the signup sheet that is attached to the email informing you of this blog post. (Forms will also be available at church in the Relief Society binders and on the display table in the hall.)
2. Decide what you want to do at Super Saturday and fill out the form.
3. Bring the form and your check made out to Traverse Mountain 2nd Ward, to church on Sunday.
4. Fill out a donation slip, indicating in the "Other" box that the money is for Super Saturday.
5. Give the completed form and donation envelope to a member of the Relief Society presidency.

Don't procrastinate, please! We need to have a good count of who's coming so we can get to work preparing! The absolute last day to sign up will be October 17th.

Saturday, February 20, 2010

Helping Hands for Haiti

On January 12, 2010 the Carribean nation of Haiti experienced a devastating earthquake, causing a need for humanitarian assistance unparalleled in recent memory. The outpouring of support has been tremendous. We have all read and seen accounts of people rushing to aid Haiti. The LDS Church has been amongst the groups providing the necessities of life to the people there. The destruction in Haiti is so widespread that aid will be needed for years to come, as the poorest country in the world struggles to rebuild.

When the earthquake happened I knew that we could do something to help. Inspired by the tremendous support that our ward gives to our Stake's annual humanitarian aid service projects, we decided as a Presidency to devote our Relief Society Commemoration (birthday party) to begin a service project to help the children in Haiti who were and continue to be effected by the aftermath of the earthquake. We will be making dolls and felted balls to send to Haiti. We will also have a quilt set up to tie that we will donate to the Humanitarian Center.

The Relief Society has a long history of providing help to those in need. Indeed the name of our organization implies that our mission is to provide relief to those who suffer. When he organized the Relief Society, the Prophet Joseph Smith commanded the sisters to, "look. . .to the wants of the poor—searching after objects of charity, and in administering to their wants.” The sisters of the Relief Society took that commandment to heart and began ministering to the families in their communities. As the church grew, so did the influence of the Relief Society. As we learned in the September 2009 General Relief Society Meeting, the sisters of theRelief Society created an effective grain storage system and then taught it to the government during wartime. They also created a hospital system and helped establish one of the great modern hospital systems. President Eyring stated in that meeting,
The Relief Society was at the heart of the beginning of the Church’s power to give humanitarian aid across the world. Leaders of nations, when they visit Utah, express awe and admiration for what the Church is doing for the poor and the victims of war and natural disaster across the world. Those remarkable gifts to the children of God are part of the enduring legacy of Relief Society.
Recently the church added a fourth mission to the Threefold Mission of the Church. It is "To care for the poor and needy." This further legitimizes the work of the Relief Society, and lets us know how vital our work is to Heavenly Father's eternal plan.

We, as women, are blessed with talents and abilities that enable us to bless the lives of others. I know that some of you will feel unequal to (and perhaps even a little uninterested in) the projects that we have planned for this night. You may think that you do not know how to sew. You may think that you are not creative. We hope that you will overcome these doubts and join us. Who knows, you may pick up a new skill that will be useful to you at some time in your life, or a hobby that will bring you joy, or even a new friend that you never knew was out there. Remember the words of President Uchtdorf, "
You might say, “I’m not the creative type. When I sing, I’m always half a tone above or below the note. I cannot draw a line without a ruler. And the only practical use for my homemade bread is as a paperweight or as a doorstop.”

If that is how you feel, think again, and remember that you are spirit daughters of the most creative Being in the universe.
It is our privilege to be in the Relief Society. It is our honor and our duty to serve the people of the world who need our help.

Please join us on Wednesday, March 17th at 6:30 at the church for a fun night of Haitian food and birthday dessert, contests (with prizes!!) and most importantly, participating in a service project that will help ease the pain of the children of Haiti. See you there!

Tuesday, January 26, 2010

Rag Quilt Class

Hi Ladies! This week we are going to have two rag quilt classes. I sent an email yesterday about the classes, but I thought it would be nice to have a post on the old blog so you can see what we're going to be making and not just have to read about it!

So, without further ado, here is the email again, but this time with photos!

On Sunday we announced a very last minute rag quilt class to take place this week. We're offering the class twice for your convenience! This is a long email, but if you're interested in coming, please read to the very end! Also, please respond to this email and let me know which class you would like to attend. Thanks!

First Class:
THURSDAY NIGHT from 7:30-9:00 at the church.

Second Class:
FRIDAY MORNING from 10:00-11:30 at the church.

These are the cute quilts with the frayed edges that you see just about everywhere. They're really easy to make and hardly require any sewing skills--anyone should be able to make these quilts!

The class will consist of a demonstration and then sewing time, if you'd like. We will not provide a Children's Class, but feel free to bring your kids along. We'll just let them have the run of the nursery! That's how we all really work anyway, right?

For this class we will demonstrate how to cut out and sew a really simple burp cloth. Once you've learned how to sew these together, you can easily expand your knowledge and make quilts or anything else you can think of. If you don't have time to buy fabric, or simply do not want to, you're still welcome to come and learn how. We will have burp cloths already pre-cut that you can sew for the Relief Society to give to new moms in our ward.

Here's what you'll need to bring if you want to work on your own project:

For a BLANKET:

1. 21 inches of three different but coordinating flannel fabrics. The fabric should be 43 inches wide. The flannel sold at Wal Mart and Joann is 43 inches wide. DO NOT PREWASH YOUR FABRIC!!!
2. White thread with a bobbin, or a colored thread that coordinates with your fabric.
3. Sharp scissors that can cut through fabric easily. Small scissors will not work for this project.
4. Sewing machine.
5. If you have them--a self healing cutting mat, a rotary cutter and a large quilt ruler.

This will make a baby blanket that measures 27" x 24" when sewn and washed. If you want to get a head start, you can cut your fabric into 5" squares before you come. Fold your fabric in half with wrong sides together and cut squares so that you end up with pairs of squares. Leave the squares in their pairs. You'll need 14 of each pair.

For a BURP CLOTH:

1. 1/8 yard of one flannel fabric, 1/4 yard of another coordinating flannel fabric, and 1/2 yard of a third coordinating flannel fabric. DO NOT PREWASH YOUR FABRICS.
2. White thread with a bobbin, or a coordinating colored thread.
3. Sharp scissors that can cut through fabric easily. Small scissors will not work for this project.
4. Sewing machine.
5. If you have them--a self healing cutting mat, a rotary cutter and a large quilt ruler.

This will make 2 burp cloths that measure 15" x 11" when sewn and washed. Sorry, it's too complicated to tell you how to precut this project, so we'll be cutting them out at the class!

IF YOU WANT TO SEW BUT NOT BRING YOUR OWN FABRIC PLEASE BRING YOUR OWN SEWING MACHINE.

Finally, you should not expect to go home with a finished project, but you'll go home with the know-how to finish. And of course, I'm only a phone call away.

See you Tursday or Friday!

PS Sorry for the dark photos! Today's weather is not good for picture taking!

Monday, January 25, 2010

New Look

Hello Everyone. I finally got around to making the blog pretty. I'd like to add some links to the side, so if you have a favorite website (or 2 or 3) leave the address(es) in a comment. Also, I was wondering if any of you are still blogging. If you would like, I can also add a section for your blog addresses. As with the links, just leave a comment with your blog's address and I'll add it.

I have some fun posts coming up, including a post where you can download and print the materials for the FHE lesson that we assembled at last week's activity.

Have a great week! I hope to see you at our rag quilt class on Thursday or Friday.

Sunday, November 22, 2009

The Recipes


For our holiday journal activity a lot of you wonderful ladies brought pumpkin treats. We had quite the spread as you can see. We asked everyone who brought food to bring their recipe, and a few of you really did it. (Trust me, I don't mind if you don't bring your recipes--it's not required--but just remember you might be depriving somebody of the opportunity to make her new favorite food if you don't! ;) )

Here are the recipes we did gather from the night. I don't know who to credit for some of them, so again, if you want me to credit you, please just shot me an email and I'll add your name to your recipe.

Pumpkin Bars
Sandra Snow

2 c sugar
4 eggs

Beat together for 2 minutes

Add to sugar and egg mixture:

4 c pumpkin
1 cup oil

Beat for another minute.

Add:

2 c flour
2 t cinnamon
2 t baking soda
1 t baking powder
1 t salt
1 t vanilla

Mix all ingredients on low for 1 minute.

Pour mixture into a jelly roll or deep cookie sheet. Bake at 350 degrees for 30 minutes. Ice when cool.

Icing
2 1/4 c powdered sugar
3/4 c cream cheese
8 T (1 cube) butter
1 1/2 t vanilla


Pumpkin Chocolate Chip Bread
Kara Paulson

2 sticks butter, softened
2 c sugar
4 eggs

Cream butter, sugar and eggs together.

Add to creamed mixture:

3 3/4 c flour
2 t baking soda
2 t cinnamon
1 t salt
1 t nutmeg
1/2 t ginger
1/2 t ground cloves
1 large can pumpkin puree

Mix by hand 1-1 1/2 c chocolate chips. Pour into 2 to 3 large loaf pans. Sprinkle sugar on top. Bake at 350 degrees for 45 minutes to 1 hour.


Spice Pumpkin Pie Spread
Unknown

When there is not time for pumpkin pie, this marshmallow-topped dessert is and excellent stand in.

1/4 c pecan halves, coarsely chopped
4 ounces reduced fat cream cheese (Neufchatel)
1 can (15 oz) solid pack pumpkin
1/2 c brown sugar
2 t pumpkin pie spice
3/4 c miniature marshmallows
2 red or green apples cut into wedges

Preheat over to 350 degrees. Coarsely chop pecans. In bowl whisk cream cheese until smooth. Add pumpkin, brown sugar and spice blend; mix well. Spoon mixture into a small baking dish. Top with marshmallows and pecans.

Bake 12-15 minutes or until marshmallows are light golden brown. Cut apples into wedges. Serve warm with apple wedges or cinnamon pastry wedges if desired.

Cinnamon Pastry Wedges
Unknown

These crispy treats are great with dessert dips of ice cream. I also like to use my own pie crust recipe if I don't have refrigerated pie crust on hand.

2 T sugar
1/2 t ground cinnamon
1 refrigerated pie crust (from 15 oz as directed on package)

Home Made Pie Crust
2 1/4 c flour
1 t salt
2/3 c vegetable oil
1/3 c milk

Place flour and salt in a bowl. Mix. Measure oil and milk in a measuring cup. Stir slightly with a fork. Add to flour mixture. Roll out between sheets of waxed paper. Makes enough for 2-12 inch circles or a 2 piece pie crust. (No refrigeration necessary)

To make wedges:

Preheat oven to 400 degrees. In a small bowl, combine sugar and cinnamon. Unfold crust into lightly greased and floured cookie sheet. Roll seams lightly, forming an even 12 inch circle. Sprinkle with cinnamon and sugar mixture, cut into 16 wedges using a pizza cutter. (Do not separate) Bake 12-14 minutes or until golden brown and crisp. Remove from oven and cool completely.

Pumpkin Trifle

Prepare and chill a 4-serving-size package of instant vanilla pudding mix. Beat 2 cups of whipping cream with 1/4 cup sugar until soft peaks form. Cut 8 slices of pumpkin bread into cubes. Layer the following into 8 to 10 small serving dishes: pudding, whipped cream and pumpkin bread. Top each with a drizzle of caramel sauce and chopped walnuts or pecans. This dessert hold in the fridge for up to 2 hours before serving. It could be served in individual dessert dishes such as votive cups. If needed buy the pumpkin bread and whipped cream and you have a quick and pretty dessert.

Sugar Cookies
Kimberly Kosorok

(My 2 cents--these are not pumpkin, but this is a really good sugar cookie recipe. I'm so excited to have it!)

1 cup sugar
1 c powdered sugar
1 c margarine
1 c oil
2 eggs

Mix all of the above together. Add:

1 t baking soda
1 t cream of tartar
1/2 t salt
1 t vanilla
4 c flour

Mix all together. Roll into balls. Roll in sugar and place on cookie sheet. Press cookies with a glass that has a decorative bottom. Bake at 375 degrees for 8-10 minutes. Don't brown--the cookies should be light. Frost after they have cooled.

Fluffy Vanilla Frosting
Kimberly Kosorok

1/2 c butter or shortening
5 c confectioner's sugar
2 t vanilla
1/8 t salt (optional)
4-5 T milk

Beat together. Add more milk if too thick. Add food color of your choice.

A couple more things. . . .

I completely forgot to show you all photos of Camille Smith's absolutely adorable kids table display. Sorry Camille! Here's your table! And thanks for all of your hard work.


Finally, I found out who made the beautiful ribbon napkin rings. It was Jeanne. She says they're really easy to make. Here is a tutorial I found online just the other day--the author uses more ribbon than Jeanne did (I'm pretty sure she said she used 1 yard of ribbon per flower. The tutorial uses 3-4 yards--yikes!!). If you attempt them, good luck! I just might make some myself. Send me a picture when you're done!


Sunday, November 15, 2009

Thanksgiving Decor from 11/4/09


We had such a fun time at our November activity making holiday journals. Everyone was able to sit around and talk to each other and build friendships. Here are some photos of the cute displays the RS meeting committee came up with.

Thanksgiving Ideas

Kristina Woodbury made these cute and super easy place cards with leaves and rubons.


Camille Smith made the cute tags you see inside the bowl. Julie Hunt put together the cute cornucopia at the upper left with sugar cones and candy.


These adorable place cards were made by Korine Cardona.


Jeanne Faucheux made these cute little place holders with terra cotta pots painted to look like candy corn. These would be so cute on a kid's table--and probably not unappreciated at the adults' table, too.


Jeanne also brought these beautiful, handmade beaded monograms. I think her daughter made them, but she can help you out if you want to try your hand at making some.


I have no idea who brought these gorgeous ribbon flower napkin rings, but I wouldn't mind a tutorial! Anybody care to claim them?


I have to admit, we were all in a little bit of awe when we saw these pumpkins Tiffany Milburn made at our committee meeting. She used real pumpkin stems and scraps of fabric. Oh, to be so creative!

Corine Cardona made these cute little pumpkins for our display. You could totally get this done before Thanksgiving!


The star of the evening were these turkeys made out of Oreo cookies, Hershey's Kisses, candy corn and sprinkles. I included a side detail for those of you trying to figure this one out. I'm sure Amber Driver wouldn't mind giving some advice if you need help.

OK, so that is the treasure trove of Thanksgiving ideas presented at our activity. Keep checking back. I'll have the pumpkin recipes up shortly as well as all of the wonderful Christmas place settings we had for you. Oh, and it probably wouldn't hurt to put up a picture of the journals that we made-just in case some of you couldn't make it to the activity, but still wanted to make a fun holiday keepsake.

Most importantly, we hope you made some new connections, got to know somebody better. The key to serving each other is knowing each other. We can do great things together!

New Blog

Hi Sisters,

So here's the new blog, but just wait. I have lots more planned for it than just this plain ol' thing. Jeremy's going to be gone for several days this week and this is my project while he's away. In the meantime, look below at some of the pictures from our last activity where we made Holiday journals. We had a great time! Mostly, I have included photos of all of the great place setting/name card ideas. Weren't they fun? I hope you enjoy--and where possible I'll put the name of the person who provided the project. If you have any questions, you can contact them directly.